Here's another layout of Ventura Beach. I used a sketch from Page Maps for it. I love the clean lines of it and the balance that the squares give to the row of photos. I used SCAL to cut out the title and Life's A Beach for the sandals and dolphin.
Now...for my exciting news...thanks to Joy over at Obsessed With Scrapbooking, I have won a Cricut Gypsy!!!! Woot woot! She announced yesterday that she would give away a Gypsy when she reached 1,000 Facebook fans--which she reached and then WAAAAY surpassed yesterday and today. In fact, the last time I looked, she had over 1,500 fans! Check her out--she always has the latest and greatest in Cricut products to demo on her personal blog as well as the blog that she co-owns, Everyday Cricut. Thanks, Joy! I cannot wait to receive it and start playing!
Thanks for looking!
Thursday, March 25, 2010
Sunday, March 14, 2010
fire engine
Jonah had a Drive-in night at Cubbies last week, and each kid was supposed to make a car to sit in during the movie. Since he's very much into firefighting right now, (dressing up, making siren noises, and putting out fake fires all over the house) we thought we'd make him an engine that he could sit in for that night but also continue to use at home to "spark" his imagination. Scott designed, cut, assembled, and painted the entire engine but he tasked me with the job of cutting out a maltese cross with my trusty Cricut. I found the cross here, on the Quilling Patch.
It was a big hit with Jonah, and we are sure to hear plenty of siren noises throughout our house for a long time!
Thanks for looking!
It was a big hit with Jonah, and we are sure to hear plenty of siren noises throughout our house for a long time!
Thanks for looking!
Saturday, March 6, 2010
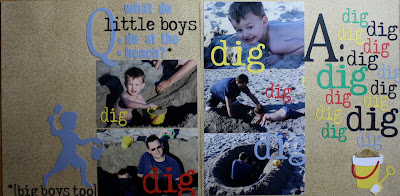
Dig dig dig dig...
One of the things that Scott enjoys most about being a daddy is the excuse to do fun things because the "kids" like to do them. The truth is, Scott loves to dig. He likes to dig BIG holes. But it would look kinda funny to see a grown man dig big holes in the sand by himself. He is thrilled that the boys are at the age where they are also interested in doing things like this. When they were finished with this hole, it was big enough for 2 people to sit on beach chairs inside. I couldn't even see Jonah and Noah inside unless I was standing over the hole. I'll let you guess who had the most fun that day. :)
The journaling reads:
"Q: What do little boys* do at the beach?
*{big boys too}
A: dig dig dig dig dig
dig dig
dig dig dig dig.."
*{big boys too}
A: dig dig dig dig dig
dig dig
dig dig dig dig.."
Here's a closer look at the first page:
and page 2:
The words were cut using a variety of ttf's on SCAL. The silhouette on the first page is from A Child's Year. The shovel and pail are from Life's A Beach. I used stickles for the sand and also added a little bit of "sand" to the corner of the shovel. I feel kind of silly mentioning Printing Press, but I did cut the two asterisks from it! :)
Thanks for looking!
Thursday, March 4, 2010
Ventura Beach
I love how this page turned out! The pictures are actually printed in color, but with the sunset just right and the silhouettes on the beach, they looked like they were printed in black and white. I used 1 piece of shimmery paper for all of the embellishments. The charms along the side are from Life's A Beach and the letters are a ttf "traveling typewriter." It is a little hard to see, but on the arrow I used some letter stamps. It says "LOVE," pointing to my 3 favorite boys at the time. I'm so lucky now I have 4 boys to love!
Easy page. Thanks for looking!
Wednesday, March 3, 2010
Dad's Birthday
Monday was my Dad's birthday, and my boys got him flower seeds to plant in his garden. I whipped up a little gift basket to put the seeds in and a quick card to complete the garden look. Here are the results:
Side 1:
Side 2:Side 3:
Side 4:
I used A Child's Year on all 4 sides of the basket. Two of the images are with the icon feature selected.
The basket itself is an .svg file from SVG cuts. The basket can be found here. It's designed with a slit in the handle so you can slip a place card in there, or in this case, a birthday card, like so:
Speaking of card, have you neglected (like I did) the card feature on A Child's Year?? This card was super easy to make...no welding necessary. It is straight from the cartridge and was cut with a simple press of the button! I thought it would be cute to have the card in the shape of a butterfly so it could be fluttering above the garden scenes. I added stickles to embellish it to look somewhat like a monarch and voila! Easy gift-giving. The entire project took probably close to an hour but could be replicated in less time (except for waiting for the stickles to dry).
Thanks for looking!
Tuesday, March 2, 2010
thank you cards
To complete the train theme for Jonah's birthday, I sent these thank you cards to our guests. The engine was from the same train I made for the "pin the caboose on the train" game at the party. It is cut from the My Community cartridge. I handwrote the greeting, "thank you so much" with various colored markers.
The card base is 4 1/4" square and the white squares on top are about 4" square. I used the corner rounder on them and inked the edges.
Thanks for looking!
Subscribe to:
Posts (Atom)