Thursday, October 30, 2008
hang in there...
Here's a very simple and quick encouragement card I made. The stamps are a set from Studio G (love those) and I used some paper from my scraps and a few watercolor pencils. It couldn't be easier!
Detailed instructions:
Supplies needed:
1 piece of white cardstock, measuring 5" by 6".
Studio G stamp set
Black ink pad (if you are looking for a quality ink pad, I recommend VersaFine for its crisp, dark images)
1 black micron pen or other similar fine-tipped pen
3 pieces scrap cardstock (I used white, pink, and blue)
Water-colored pencils (yellow, red, green)
Instructions:
1) score the big cardstock in half along the 3" line and fold so that the card measures 5" by 3".
2) Stamp the roses on the white scrap. Cut around the image, leaving a small (1/16" to 1/8") border around it.
3) Mount the stamped image on the pink scrap and cut to leave a small border around it. Mount that onto the blue scrap and cut another border.
4) Mount all 3 layers to the card base, approximately in the center of the card.
5) Stamp the hanger above and the sentiment below the roses. Stamp the hearts below the sentiment.
6) Use watercolor pencils to color the image. I used red for the roses and hearts, green for the leaves, and yellow for the background of the stamp.
(To use watercolor pencils, color around the edges of the design and use q-tips or a fine paintbrush dipped in water to spread the color so it fades in towards the center of your design. Simple and pretty!)
7) Using your Micron pen, draw lines to connect the hanger and the image of the stamped roses.
You're finished!
Thanks for looking!
I'm taking the weekend off from the blog, so I'll see you back next week! November already...WOW!
Wednesday, October 29, 2008
Alaska
Here's Alaska...the state is cut at 5" (gotta love those tiny islands). The flag is at 3", the bird and flower are cut at 2 1/2", and the name 'Alaska' is cut at 1". Once I find the quarter, it will go in the upper right corner. The flag will open up to reveal journaling about Alaska state facts.
Thanks for looking!
Thanks for looking!
Tuesday, October 28, 2008
Alabama
Here is a sample of a page in my 50 states album. I still have to mark the capitol and include the journaling (the flag flips open to reveal where the journaling will go). The album is 8x8. I used stickles on 'Alabama' to make it more visible, as the color I am using for the states is a dark plum. The state is cut at 4". The flower and the bird are cut at 2 1/2" and the flag is cut at 3". The envelope that I am using to hold the quarter is from Fabulous Finds, using the Windows feature (pg. 111 in handbook), cut at 2". I cut up some squares of the plastic that covers Cricut cartridges and Cuttlebug embossing folders and slid them inside so the quarter doesn't fall out.
I'll post Alaska next (sans the state quarter that either hasn't been released yet or I have not found one yet).
Thanks for looking!
I'll post Alaska next (sans the state quarter that either hasn't been released yet or I have not found one yet).
Thanks for looking!
Monday, October 27, 2008
thankful...
Don't you just love this season? The leaves are bursting with color and as they fall to the ground I absolutely love hearing them crunch under my feet! The days are cooling off and treats are in the oven, filling the house with mouthwatering aromas. The holidays are quickly approaching and extended family will soon be gathering together. There is truly much to be thankful for!
I created this card for the latest Chirper Challenge. We had to use the color orange, some stapes, and the word 'thank' in some form.
Here are more views:
Here are some instructions, if you want to make this card:
You will need:
*1 cream-colored A-2 card (4 1/4" x 5 1/2")--(If you have 1 sheet of 8 1/2" by 11", you can make 2 A2 cards by cutting it in half to make 2 sheets of 8 1/2" by 5 1/2" and then scoring in half at the 4 1/4" mark.)
*2 scraps of cream-colored cardstock (1 cut at 3 1/4" by 2 7/8" and the other cut at 3 1/4" by 3/4")
*2 scraps of plum or brown cardstock (1 cut at 3 1/2" by 3 1/4" and the other cut at 3 3/8" by 7/8")
*1 scrap of orange cardstock (1 3/8" by 5 1/2")
*1 piece of ribbon (approx. 7")
*2 brads
*Alphabet rub-ons (I used Heidi Grace). You can substitute alphabet stamps or Cricut letters for this, but you may need to adjust your scrap sizes.
*1 cut of the flower from Joys of the Season (cut at 2 1/2")
*Swiss Dots Cuttlebug folder
*Orange stickles (optional)
*staples (optional)
*pop-dots (optional)
Instructions:
1) Put stickles onto the flower and set aside to let dry. (optional)
2) Run the orange scrap and the larger cream scrap through the cuttlebug.
3) Mount both cream scraps to the plum scraps.
4) Rub-on the sentiment on the smaller cream scrap.
5) Place the brads on the left upper and lower corners of the smaller cream scrap.
6) Adhere the ribbon to the orange scrap, folding over the excess length on the top and bottom to hide it.
7. Staple the top and bottom of the ribbon. (optional)
8. Adhere the orange scrap to the card so that the edge lines up with the fold of the card.
9. Adhere the large cream scrap to the upper right hand side of your card. It will overlap the orange scrap.
10. Place pop-dots on the bottom of the sentiment (optional) and adhere at the bottom of the card.
11. Once the stickles are dry, adhere the flower to the center of the large cream scrap.
Finished:
Thanks for looking!
Saturday, October 25, 2008
Happy Birthday, Rose!
Today is my mother-in-law's birthday! If you read this, Happy Birthday, Rose! And here is a sneak peak of the gift you will be receiving when we visit next weekend. :) It's a brag book (this particular one is called a Squash Book--you'll see why later in the post) that measures about 4" that is easy to put in your purse and show off to whomever is willing to look at darling pictures of 2 of your grandchildren! ;)
For the top and bottom, the directions called for 4" chipboard or coasters. I cut my squares from the most similar thing: a box of diapers (I can make a LOT of these, as there are many boxes of diapers in this household)!! To prevent advertisements such as 'leakproof' or 'drier nights mean drier mornings,' I covered the box with attractive paper from ScrapHappy. The flower die-cut is from Joys of the Season, and I used my white Signo pen to draw little dots around it.
A side view, showing the ribbon that holds it closed:
A view of the back: If you make a Squash Book for yourself, it is important to note that the ribbon is only adhered to one side of your book-either the front or the back (you'll see why in the last picture). I attached mine to the front, so the ribbon is just pulled across the bottom in the picture below--not glued on. Here is what it looks like fully opened:
It is hard to see, but if you look closely you can tell that the front of the book is attached at the lower left-hand picture, and the back of the book is attached to the upper right hand picture. This is why it's important to only adhere the ribbon to one side or the other--otherwise your book will not open. I chose to cut some of my pictures diagonally, but other options would be to use pictures that can fit into smaller triangles or to include journaling or other embellishments in those areas.
It is called a Squash Book because as you pull the front and back of the book together to close it back up, the pictures fold up onto each other, 'squashing' them.
There are several sets of directions for Squash Books on the web, but I used this video tutorial on YouTube from LytleScrapper. If you prefer written instructions, you can find them here on Splitcoaststampers.
Thanks for looking!
Busy...and Loving it!
It's almost 12:30 (a.m.)!?! and I've been up to some serious crafting tonight. I have through Michigan completed in my 50 states book (I'm working on it alphabetically), I created a card for the next Chirper Challenge, and I made a birthday present for my mother-in-law. Whew! Who knew all that could be done when the husband takes our 2 year old camping for the night? And it was all done between taking care of a sick baby. Poor Noah. He's got a fever and runny nose, and he's not sleeping well.
I know I said I'd post pictures of the 50 states book. I will--just haven't gotten to it yet. I'll try again tomorrow, after Scott and Jonah return from their adventure. (They took the camera.)
Well, instead of typing a post for this blog, I really should be cleaning up my mess so I can be getting some sleep tonight, too. I don't know when Noah will need his mommy next! :)
Wednesday, October 22, 2008
50 States
I've decided to do an album of the 50 states. I started last Friday and have put several hours into it already. I am really enjoying the 50 states cartridge. I can see it being very useful as the boys grow and learn about the states. It also has a lot of extras on it, and if you use your imagination, its usefulness just continues to grow.
The cartridge contains cuts for each state, the name of the state, the location of the capitol on the state, the name of the capitol, the state flag, the state flower, and the shadow for the state, name of the state, and state flower. Wow!
As I am getting to know the cartridge by cutting many of these shapes for my album, I am realizing just how useful it is! I am already thinking that many of the birds on it would be nice for masculine cards. The cardinal could be used on Christmas cards. Of course, I could use the California seagull (Utah's state bird, by the way) on layouts for the beach. I'm planning to use the bear from the California state flag on a page of a backpacking trip we took. The Rhode Island flag has an anchor on it--perfect for our outing to visit the tall ships. The flag of Alaska has the Big Dipper on it, for those who have visited planetariums or just enjoy star gazing. The pelican will be a nice addition to a Morro Bay page.
Which reminds me...do you know why they are called a pelican? (That one's for you, Dad. I couldn't resist.)
So, back to the album--for each page, I am cutting out the state, its name, the flag, the flower, and the bird. The flag is acting as the front of a card that flips open to reveal journaling about the state inside. I am also using a cut from the Fabulous Finds cartridge on each page to house the quarter for that state.
I will take some pictures today to post. I am realizing that seeing it will be a far better explanation than my words. :)
(And, for those that are still working on the pelican riddle, they are called PeliCans because their beaks can hold more than their 'Belly Can.') We heard that joke every year growing up--once for each time we saw our first pelican on our annual trips to Morro Bay.
Monday, October 20, 2008
Family
I completed this layout for the Chirper Challenge. After looking through my family scrapbooks, I realized that I had never done a page with both sides of the family together on one page. So, my goal was to include as many people from our families as I could. I was able to get most everyone on. Jonah really loves to look at this page and tell me who everyone is. I am so glad to be facilitating a love for family in my two sons.
I used the Cricut Sampler for the Family cut--but it is on Going Places. I handstitched around the square and hung some plastic heart embellishments. The title/journaling says, "Love is the tie that binds the family together." I used rub-ons from Heidi Grace on it. Each square is cut at 2 1/2 inches. The flourish is a stamp from Rhonna Ferrar and I heat-embossed it with gold embossing powder.
A close up:
Thanks for looking!
Saturday, October 18, 2008
Tips and Tricks - Mountain or Valley?
I had an 'aha' moment tonight. The other day, I was reading a discussion on a forum about which way to fold cards after scoring them. I know, I know. About 0.5% of the population may actually be genuinely interested.
Hi, my name is Amy, and I am part of the 0.5% of the population.
Anyway, the original poster had asked if the scored side was supposed to be the mountain side or the valley side. Well, since the scoring leaves an indentation in the paper, I had always thought that it was the natural valley side. I stand corrected. Here is why:
The purpose of scoring is to uniformly weaken the bonds in the paper along a straight line to prevent the paper from cracking when it is folded. Because the bonds are weaker along the scored line, the fibers along the score line are able to travel a farther distance, and thus should form the mountain of the fold.
If that didn't convince you, it's the way Hallmark (and more) does it. Try it. When I folded my score lines as a mountain, I ended up with a crisper crease, smoother inside, and edges that lined up better.
If you still don't know what I'm talking about (i.e. what is scoring?), disregard this post and continue folding your paper as you always have been. Or leave a comment.
Friday, October 17, 2008
Tips and Tricks-clear stamps
This is the first post in a series of Tips and Tricks, designed to help crafters use what they have more efficiently, or to encourage thinking 'outside the box.' I will be adding more tips and tricks periodically. If you have a question or suggestion you would like to see addressed, please feel free to leave me a comment. I will do my best!
Clear stamps are all the rage right now because they allow you to see the precise placement on the paper. I love them! You can pick up a set of some clear Studio G stamps for as little as $1 at many craft stores, and the Fancy Pants set I bought retails for $45 (but I didn't pay near that!), so they appeal to a wide range of budgets.
Clear stamps require some sort of acrylic stamping block (sold separately) to properly use them. The stamps cling to the acrylic block and can be peeled off after use. They are available in many sizes to accommodate different sizes of stamps.
Now for the tip:
Can't find your acrylic block? Don't have the right size? Don't want to spend more money than you have to? No problem!
As long as you have a collection of CD's, you're okay! Instead of acrylic blocks, try sticking those clear stamps on the CD cases. Other things you can use (my preferred method) include the Cuttlebug plates, or the glass from a small picture frame. I don't even own any acrylic stamping blocks, but that doesn't stop me from using all those wonderful clear stamps!
Thanks for reading! I hope this may help someone.
Wednesday, October 15, 2008
Product Review: ATG / Adhesives
A couple of months ago, I convinced myself to invest in an ATG (adhesive transfer gun). The link provided will take you to the online store where I bought mine from, www.cropandstick.com. (Excellent customer service, extremely fast shipping, highly recommended.) I bought the 714 model, which uses 1/4" tape (the 908 Gold is acid-free).
Many who read this may wonder if I'm insane for spending $40 for a tape dispenser and another $40 for 12 rolls of tape. I know. I was once a skeptic myself. Perhaps a little background may help.
I formerly used photo splits like this or a similar kind to work on my scrapbooks. Like many other scrapbookers know, they have a layer that peels off to reveal the double-sided tape. Those little pesky squares would end up all over the place! However, the mess of the photo squares would never be enough to convince me to purchase the ATG. Sometimes the size of the splits was wrong for my project. I would find myself cutting these little squares in half or even into fourths to accommodate my craft. Or, being cheap, I would try to double my investment by cutting each square in half, using half as much. However, the inconvenience of cutting the photo squares would never be enough to convince me to purchase the ATG. Then, to my dismay, I would find my pictures eventually falling off the page. OK...no more cutting them in half. While some brands were better than others, I became increasingly disappointed in the "long-term stick" of the photo splits. I knew I had to find a way to adhere my pictures and other embellishments to my pages that would hold over time. The search for the perfect adhesive was on.
I tried glue sticks which were okay for the lighter stuff (like letters) but wouldn't hold the heavier stuff (like, say, pictures) very well. I then tried tape runners. I had steered clear of them before, as they were pricier, but I figured it would be worth it if I didn't have to keep re-doing my pages. However, at the rate I was going, I was using them faster than I had 40% off coupons to buy refills. And, even one brand of tape runner did not hold well.
Enter the ATG. My mom has had one for a few years. Though I had never used hers, I thought it looked to bulky to comfortably use. But, I would hear her say how she had to make sure she had her placement right the 1st time--because it sticks so well that there's no re-doing it. There's also no mess to clean up. You just press the trigger while dragging the dispenser where you want the tape, release the trigger, and you're done.
At this point, I was convinced of the quality and the convenience, but the price was still prohibitive...that is, until I pulled out my calculator and let the numbers do the talking. For the price I was paying for the refills for my tape runner, it came to anywhere between 13 and 16 cents per foot of adhesive. Refills for the ATG (I bought in bulk to reduce the price per refill) came to (drum roll please)...less than 3 cents per foot! The ATG will pay for itself in less than 4 refills.
There is another site, thetapedepot.com, that sells a 12-pack refill of the ATG 7502 for only $18. There is some conflicting information over whether this particular model number is acid-free, but that would bring the price per foot down to about 1.4 cents. Bargain!
To get an idea of how long a refill may last, I have had my ATG for about 2 months and I try to craft at least a little bit each day. More realistically, I get 1-2 projects done 3-4 times per week. I am almost halfway finished with my second roll of tape.
So, my husband was happy that it would save money over the long run. I was happy because I found an adhesive that would stick over the long run. A quality adhesive at an economical price? That's what we call a win-win!
Summary:
*Photo Splits:
Convenience: C-
Quality: C
Price: C- (15.6 cents per foot)
Overall: C-
*Tape Runners:
Convenience: A
Quality: B
Price: C (13-16 cents per foot)
Price: C
Overall: B
*ATG:
Convenience: A- (the bulk takes some getting used to, but it's not heavy)
Quality: A
Price: A+ (over the long-run)
Overall: A
The ATG is very highly recommended for crafters who use adhesive on a regular basis. Only buy if you will use it enough to justify the cost over the long run.
Disclaimer: I am not associated in any way with Scotch ATG, nor do I receive any benefit from them or anyone else for a favorable review. I'm just sharing my experience with other crafters who will hopefully benefit.
Thanks for looking, and have a great day!
Monday, October 13, 2008
All hearts come home for Christmas
This layout features family pictures taken back in 2001. I cut the title from Mickey Font at 1" and 1 1/4". The reindeer and sleigh were cut from Christmas Cheer, and the Santa and his bag is cut from Joys of the Season. I decorated the sleigh with stickles and wrapped two of the pictures with ribbon.
A closer look:
Thanks for looking!
A closer look:
Thanks for looking!
Sunday, October 12, 2008
Not a Creature Was Stirring
Journaling says, "It is a Staley family tradition to see who can "fall asleep" the fastest on December 24th. Ever since I can remember, as our Christmas Eve festivities were nearing an end, my sisters and I would race to our rooms, put on pajamas, brush our teeth, and hop into bed. We knew it wouldn't be long before Mom and Dad came to check to see if we were sleeping. As soon as our heads hit our pillows, my sisters and I would have a snoring contest, trying to convince our parents that we were truly asleep so that Santa could come! Dad would always praise the loudest snorer as being the "goodest" girl and the one most ready for Santa's visit, and he would tickle us to try to wake us from our "slumber." We sisters grew older and are no longer at the Staley household for most Christmases, but our children will most definitely be subject to the same silly traditions we enjoyed growing up."
The fireplace and holly border are from Joys of the Season, and the stockings are from Christmas Cheer. The title is from Storybook and is cut at 1 1/4 inches.
A closer look at the detail in the fireplace:
Thanks for looking!
The fireplace and holly border are from Joys of the Season, and the stockings are from Christmas Cheer. The title is from Storybook and is cut at 1 1/4 inches.
A closer look at the detail in the fireplace:
Thanks for looking!
Thursday, October 9, 2008
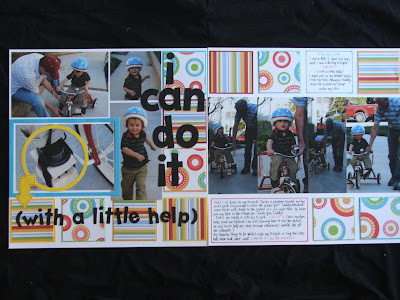
I CAN DO IT (with a little help)
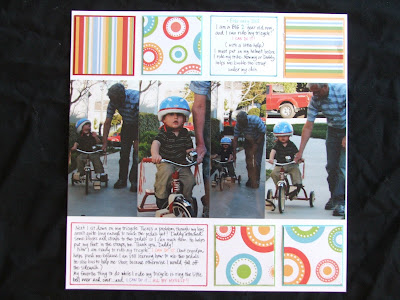
Journaling says, "I am a BIG 2 year old now, and I can ride my tricycle! I CAN DO IT! (with a little help.) I must put on my helmet before I ride my trike. Mommy or Daddy helps me buckle the strap under my chin.
Next I sit down on my tricycle. There's a problem though: my legs aren't quite long enough to reach the pedals yet! Daddy attached some blocks and straps to the pedals so I can reach them. He helps put my feet in the straps, too. Thank you, Daddy!
Now I am ready to ride my tricycle. I CAN DO IT...(but Grandpa helps push me because I am still learning how to use the pedals. He also has to help me steer, because otherwise I would fall off the sidewalk.)
My favorite thing to do while I ride my tricycle is ring the little bell over and over...and I CAN DO IT...ALL BY MYSELF!!"
Paper is DCWV and Colorbok. I drew boxes around the journaling with BIC Mark-Its. The title is cut from Mickey Font at 2" and 1". The circle is cut with Printing Press, and the arrow is from Graphically Speaking.
A closer look at page 1:
and page 2:
Thanks for looking!
Wednesday, October 8, 2008
Almost a Milestone
Pictures are of my firstborn, Jonah, when he was 5 months old, learning how to sit up. I stole the title from my mom's scrapbook layout of the same pictures. Thanks, Mom! :)
Journaling reads: "Oh, how I love this stage! You are trying so hard to sit up, Jonah, but you can't quite get there...yet. Try, try again, Jonah! With your determination, you'll be sitting like a pro before you know it!"
Paper is DCWV. Brads are Colorbok. Rub-ons (lettering on top picture) are from Autumn Leaves (Big Lots $1 find). Title is cut from Mickey Font at 1". Photo corners are my own cuts from scrap colored cardstock (various brands).
Thanks for looking!
Tuesday, October 7, 2008
Waterfall Card
Here's another waterfall card. If you know my Dad, you know he loves toy trains. He also has 8 granddaughters who love pink. When the girls were little, they had the audacity to actually put Barbies on the trains! Ever since, there has been joking back and forth in my family about 'girly' toys vs. 'boy' toys. This card was inspired by that friendly debate, and when I received a stamp set of a train with hearts on it, I knew I had to use it to give to someone in my family. Now I just have to decide...should I give it to a niece who would love the pink...or to my Dad who would love the train? ;)
Sunday, October 5, 2008
When You Wish Upon A Star
These pictures were taken at the end of a long day at Disneyland. I don't know if I'd ever seen kiddos as tired as these two were. They fell asleep almost before they were buckled into their carseats, and they didn't even wake up when we got home and took them out of the car. They sure had a great time...we all did.
The title is made from stickers, and the Mickey Mouse images are stamps. The stars are punched from metallic silver paper.
Thanks for looking!
The title is made from stickers, and the Mickey Mouse images are stamps. The stars are punched from metallic silver paper.
Thanks for looking!
Saturday, October 4, 2008
Waterfall Card
This is a birthday card I made for Scott's younger brother, Chris. I thought his birthday was today, but it was actually yesterday (sorry, Chris). As you pull the ribbon, it sets the 'waterfall' in motion, revealing a series of stamped images and finally your message. Instructions can be found here if you're interested in creating one for yourself.
A view of the card, "in-motion:"
And finally, the last image. You can put the sentiment on the pull-out strip so that it appears as you pull on the ribbon. Alternatively, you can use the whole thing as a card front and put your sentiment on the inside of the card.
Thanks for looking!
A view of the card, "in-motion:"
And finally, the last image. You can put the sentiment on the pull-out strip so that it appears as you pull on the ribbon. Alternatively, you can use the whole thing as a card front and put your sentiment on the inside of the card.
Thanks for looking!
Friday, October 3, 2008
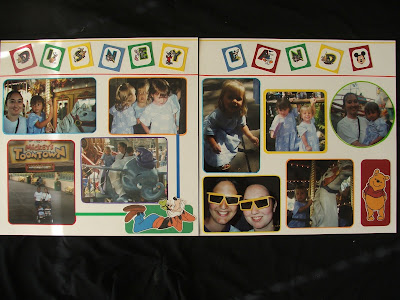
Disneyland
Thursday, October 2, 2008
Disney Princesses
Wednesday, October 1, 2008
Disney-Meeting Pooh and Mickey
Subscribe to:
Posts (Atom)